

This article is for those who:
- use Google Tag Manager and the data layer to implement enhanced ecommerce (see our handy guide),
- use Google Tag Manager to manage their Facebook Pixel, and
- are interested in running dynamic retargeting ads for a Facebook Catalog.h
In order to send existing enhanced ecommerce data into Facebook, you will have to fulfill the requirements needed to run your dynamic retargeting ads. At a minimum, you need to send the associated parameters for the ViewContent, AddToCart, and Purchase Facebook events. Each variable can be extracted from an existing enhanced ecommerce setup.
Let's Begin With Some User Defined Variables
For starters, you’ll need to create a few user-defined variables in Google Tag Manager that will extract data from the enhanced ecommerce code and translate it into a format readable by Facebook.
Variable 1: FB - Product Detail ID
This first variable will pull the Product ID from a product detail impression. This will be used in both your ViewContent and AddToCart tags. The configuration for this is fairly simple, just create a data layer variable type named FB - Product Detail ID with the following settings:

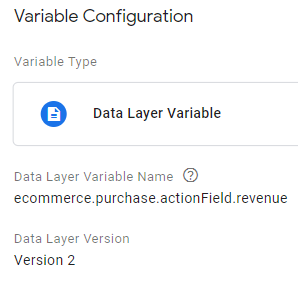
Variable 2: FB - Revenue
Then, you will need to send a value along with the Purchase event so you can properly track and optimize for revenue within Facebook. This can be extracted directly from the enhanced ecommerce purchase array that you should get every time a transaction occurs.
To do this, create a data layer variable type with the name FB - Revenue using the following settings:
Variable 3: FB - ecommerce.purchase.products / FB - Purchase ID Array
Additionally, you will need to send an array of product IDs to track which products were purchased by Facebook users. But to get to the end variable, we will actually need to create another variable first.
Therefore, create a data layer variable called FB - ecommerce.purchase.products with the following configuration:
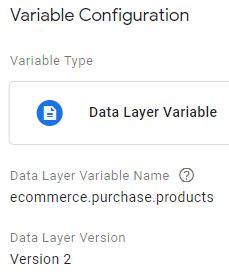
This will pull the individual product IDs from your purchase array.
Next, create a custom JavaScript variable in Google Tag Manager called FB - Purchase ID Array using the following script:
function() {
var products = {{FB – ecommerce.purchase.products}};
return products.reduce(function(arr, prod) { return arr.concat(prod.id); }, []);
}
This will create an array of product IDs for all products that are purchased that can be passed into Facebook.
Now You Can Configure Some Tags
Using these variables, you can now configure tags for the Facebook events ViewContent, AddToCart, and Purchase.
REMEMBER: Use advanced settings to make sure that your base Facebook Pixel fires before any of these tags, otherwise you risk losing data.
Tag 1: ViewContent
You can now create a custom HTML tag for sending a ViewContent event into Facebook. Use the following code:
<script>
fbq('track', 'ViewContent', {
content_ids: {{FB - Product Detail ID}},
content_type: 'product'
});
</script>
<noscript>
<img height="1" width="1" alt="" style="display:none"
src="https://www.facebook.com/tr?id=<INSERT_FB_ID>&ev=ViewContent&cd[content_ids]={{FB - Product Detail ID}}&cd[content_type]=product/>
</noscript>
As far as triggering goes, that is up to you. We typically set this as a pageview to a product page only so that we can limit tracking to meaningful content views only.
Tag 2: AddToCart
Your AddToCart tag should be triggered by your existing enhanced ecommerce addToCart trigger. Use the following code for this tag:
<script>
fbq('track', 'AddToCart', {
content_ids: {{FB - Product Detail ID}},
content_type: 'product'
});
</script>
<noscript>
<img height="1" width="1" alt="" style="display:none"
src="https://www.facebook.com/tr?id=<INSERT_FB_ID>&ev=AddToCart&cd[content_ids]={{FB - Product Detail ID}}&cd[content_type]=product/>
</noscript>
Tag 3: Purchase
Your Purchase tag will use the following code:
<script>
fbq('track', 'Purchase', {
content_ids: [{{FB - Purchase ID Array}}],
content_type: 'product',
value: {{FB - Revenue}},
currency: 'USD'
});
</script>
<noscript>
<img height="1" width="1" alt="" style="display:none"
src="https://www.facebook.com/tr?id=<INSERT_FB_ID>&ev=Purchase&cd[content_ids]=[{{FB - Purchase ID Array}}]&cd[content_type]=product&cd[value]={{FB - Revenue}}&cd[currency]=USD/>
</noscript>
In enhanced ecommerce, transactions are not events. Instead, they are actions defined in an array (as explained here). For triggering, just use whatever identifier that confirms a transaction has occurred (ex. Confirmation Page viewed, button click event, etc).
Summary
These methods will not only save you time in setting up your Facebook Pixel for dynamic retargeting, they will also allow you to more easily integrate your Google and Facebook advertising strategies (which is also the subject of our next analytics article!).
Need Help with Your Analytics Integration?
Flint Analytics can help your company execute tough analytics setups like this. If you want help, contact us for a free consultation today!


